Wednesday, June 26, 2013

Be with you in a minute!

Just stopping by to say hello, and that business as usual will be resumed very soon.

I broke my computer.  Like, completely broke it.  Broke as in cracked the screen so I couldn't read anything or see what I was clicking on!  Don't ask me how, I have no idea.  Luckily I started backing up my pics a couple of weeks ago, so had just enough time to frantically save everything else before it packed up.  Lesson learnt in a big way!

So, no photos or fun posts, but plenty in the works as I get this new comp up to speed.

Kate
xxx

Saturday, June 22, 2013

Coffee Table Before & After


Here is my starting point - a $30 Craigslist coffee table, in all his gingery glory!


This was definitely a well used table - and it had the rings and stains and scuff marks to prove it.  Some were just on the surface and others were deeper ridges and nicks in the wood.


There was only one thing for it - invest in a sander!  (hmmm, he was looking extra orange in this shot.  Lovely!).


I sanded and sanded and sanded.  You can tell how long it took me by the fact the table was in complete sunshine when I started and complete shade by the time I had finished.  It was totally worth it as I was left with a nice smooth clean surface to work with.


I knew I wanted to paint the legs white.  I gave them a rough sanding by hand and then layered on 2 coats of white paint.


Next up was the table top.  I was really torn between painting or staining.  In the end I went for stain.  Mainly because I've never stained anything before and thought, at only $30, this was the piece to experiment on.  And also because I wanted a more muted/subtle finish.

Now for how to tackle the staining process.  I could have gone with an allover dark finish - but where's the fun in that!  Since I had decided on stain, I thought I might as well go all out and try something different.  I considered a chevron pattern, but the idea of trying to tape all those zigzags really didn't appeal.  In the end I came up with a Union Jack.  The table had the perfect dimensions (44" x 26"), and being from the UK I figured I should own at least 1 Union Jack based piece of furniture!


A quick stop a Lowes and I had picked up 2 tins of Minwax Wood Finish (Golden Pecan and Dark Walnut), a roll of painters tape and some foam brushes.

I started by applying an allover coat of the lighter pecan colour - this would represent the white in the flag.  I used a foam brush to apply the stain and rubbed any excess off with an old rag.


Next up was taping off the white areas to build up the darker colours that would represent the red and blue.  I used 1" painters tape.  There was a lot more measuring involved than I had bargained for (the chevron wasn't looking like such a bad option at this point!), but I wanted to make sure it was as to scale as possible and not off center or wonky.  For anyone interested, I used a 1" outline round the larger middle cross, and 1.5" and 0.5" on the smaller diagonal cross.  The large cross is 6" wide (including tape) and the diagonal cross is 3" wide (including tape).


I Googled to see how the painters tape would hold up with stain instead of paint, but I couldn't really find any info on leakage/bleeding/tips etc  In the end, I just went for it.  For this stage I used Minwax Dark Walnut.  I would be lying if I said I wasn't at least a little alarmed when I began to sponge on the wax.  It was much runnier than I thought it was going to be and looked like oil, and I felt certain it was seeping right under the tape.  I powered on regardless, following the directions on the tin.  I didn't let it sit for very long as I was paranoid it was going to be a blotchy mess.

But unbelievably, after wiping away all the excess, I peeled of the tape to reveal crisp clean lines.  There were a couple of spots where I hadn't sealed the edges properly (mainly around the outside lip of the table) where the wax had gathered, but with a bit of elbow grease it was easy to blend in.


Next up was the second layer of Walnut to make the blue area of the flag a little darker than the red.  This was much easier than the initial taping as all of the measuring was done.  I simply ran the painters tape around the existing triangles, trying to stick to the lines as I went.


I was a little more confident this time around when applying the stain.

Between each stage I allowed the stain to dry for 24 hours, and I sealed it all with 2 coats of Minwax Fast Drying Polyurethane.  The new knob was a $2 Hobby Lobby find.

I'm so pleased (and surprised!) with how well it turned out.


Now for a good old before and after shot.  No more ginger coffee table for me!


More pics to come when I get it off the ugly driveway and into the living room!


Kate
xxx

I wanted to stop by to add just 1 last pic of the table in its new home (excuse the quality - its a phone snap!).


Linking up to East Coast Creative's amazing competition


DIY Show Off


By Stephanie Lynn
Home Stories A2Z
Furniture Feature Fridays

The Humble Brag Supporting Habitat for Humanity

Funky_Junk's_Party_Junk_link_party_150

Friday, June 21, 2013

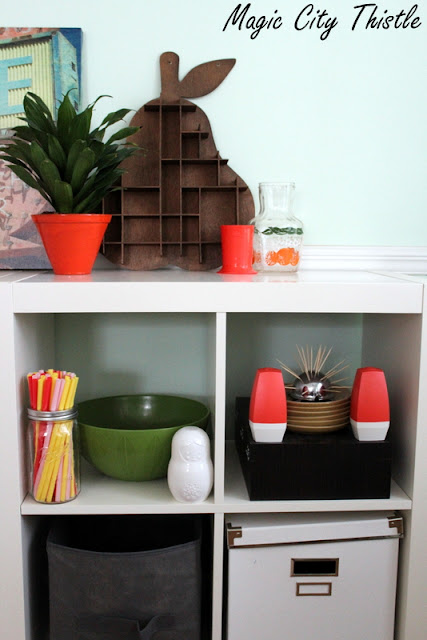
Adding some Storage

I'm trying hard not to turn our house into an Ikea showroom, but its really hard.  Their furniture is just so functional and well, cheap!

On one of our recent trips we picked up 2 white Expedit .  I initially wanted to use them as nightstands in the master but they looked terrible.  They were waaay too big for the space and quickly made their way into the junk guest room.

This weekend I decided to move them into the kitchen to see how they looked, and I kind of like them there.

This is how it was looking before, with the extra slimline shoe cabinet also from Ikea (of course!).


Anything that gives me extra surface space for all my knick knacks is always a winner.  You can never have too much storage especially in a kitchen, and there is still plenty of room to sit at the table.


Yes, that is a real plant and no I haven't killed it (yet!).


This sweet little pear shelf was a couple of dollars from J&J Junk.  Any ideas what I should fill it with?


I love that I can finally display my green Catherine Holm bowl (even if it is just plastic!).


Extra points for spotting the wonky white lid, ha!  I didn't even realize it was at a jaunty angle until I uploaded it.  Note to self - must pay more attention to detail!


I collected most of my treasures from thrift stores and flea malls over the past year.  The Cafe print was only $7 from The Christmas Tree Shop and the round orange geometric tray was from Michaels.  It's definitely an eclectic jumble.


And I promise the big coffee table reveal will be on Monday, because I know you've all been eagerly awaiting the amazing unveiling, ha!  Just one more coat to seal it and it will be finished.

Have a great weekend whatever you have planned.

Kate
xxx

Tuesday, June 18, 2013

Table Time

I've been a busy bee over the past few days working on my first furniture project  (about time, right?).  I mean, I've tackled the odd flat pack here and there and changed out some hardware, but this is my first real furniture transformation, and I'm loving it!

I even splashed out on a sander!  Good grief, I think I aged 10 years just typing that, ha!

This is a sneak peek at the before. 


There has been a lot of drying time involved so hopefully everything should be sealed and ready to show off by the end of the week.

In the meantime, here are some pretty flowers that are defying all the odds and surviving in our garden (see Mum, I told you we had flowers!).


Also, has anyone else noticed that everyone in blogland is moving?  I can't wait to see how they all approach their new spaces and transform them.  Here are some of my faves:

Young House Love:


Little Green Notebook:


House of Hepworths:


I'm also keeping an eye on Yellow Brick Home as they will be revealing their new pad any day now - and it sounds like it's going to be a mammoth renovation converting 2 apartments into 1 family home.

Kate
xxx

Wednesday, June 12, 2013

Finding A Place

I've been on the lookout for a place sign for the past couple of months.  You know the ones with the list of streets or areas.  Some of them are like bus signs and some of them are just a fun list.

I really wanted to find one that meant something to me.  I was thinking about getting my DIY on, but when I saw this at HomeGoods I knew I had to have it.


I love that it's like 3 planks of wood, and I used to work in Paddington before moving to the US so it's a nice reminder of home.  And the cherry on top, it was only $25!


It's hanging out in the living room next to the french doors.  I'll hopefully take some wider shots this weekend (I just need a couple of days hours to tidy round first!).

Kate
xxx

Tuesday, June 11, 2013

Design Star

Did you catch the first HGTV Star show of this season?  I'm already hooked.  From the lovable David Bromstad, to the shameless product plugs (we get it Lumber Liquidators, we get it!), to the contestants soundbites that are guaranteed to come and bit them in the butt by the time this season is over.  I love it all!

The fabric and wallpaper design concept in the first challenge was a nice twist. And I liked that they were given free rein but I wish we could hear what their budget was.

My favorite line of the night had to be: "it's not going to be fine, it's disgusting".  How right you were Ann!

Other first impressions:

Jessi = Taylor Swift


Jeribai, news flash, the JT brand already exists and it belongs to Justin Timberlake!


Ann, matched her crazy red room to her crazy red hair.


Brooks, mad scientist, heavy on the taxidermy!


Tobin, token carpenter


Poor Cris, you know as soon as they say "I quit my job to be here" they're in trouble.


Tyler was my fave, even though we only saw his room for a nanosecond.  This is a terrible picture, but I promise it looked good as a whole.


Anyone else gripped?

Kate
xxx

Friday, June 7, 2013

Whale of a time

How's this for a cheapo frame filler - a gift bag!  I'm a big fan of framing wrapping paper but this is my first time framing a gift bag (groundbreaking, I know!).  It was a whopping $1.99 from TJ Maxx and I love the print - it looks a bit like a whale.

Not much of a tutorial for this one.  Buy cheap gift bag.  Cut up cheap gift bag.  Put cheap gift bag in frame.

Ta daaa.


In furry friend news, Murph is now sporting his Summer 2013 line (ie he had a hair furcut).


In his defense, we had just gone upstairs and the air hadn't been on so it was pretty hot.  He's not usually this much of a mouth breather, ha!

As soon as it cooled down, he was back to his crazy self.  The black and white blur is the first toy we ever gave him after bringing him home, and he LOVES that stinky thing.  We wash it regularly but it still always stinks. 


This will be the first weekend in a while with no travelling or working so I'm really looking forward to getting stuff done around the house.  Look out for more updates next week - I'm determined to have a productive weekend.

Kate
xxx